

How to install a card machine
Great news – your new terminal has arrived and you’re ready to start taking card payments. But how do you get everything set up? Make sure you’ve got your Merchant Identification Number (MID) to hand, then read on for our fuss-free guide to what’s included in your card machine box, and easy step-by-step instructions for setting up your countertop, portable or mobile device.
Quick Links:
> What you will need
> How to install your card machine
> Get in touch

What you will need
Countertop
What’s included in your box?
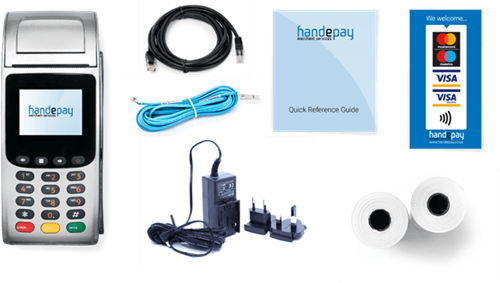
As well as your countertop card machine you can expect to find a power supply, Ethernet cable and phone cable. These will power your machine and connect it to your phone line or broadband. Also included will be window decal, to advertise that you take card payments, two paper rolls so you can print receipts, and a quick reference guide to operating your card payment machine.
Portable
What’s included in your box?
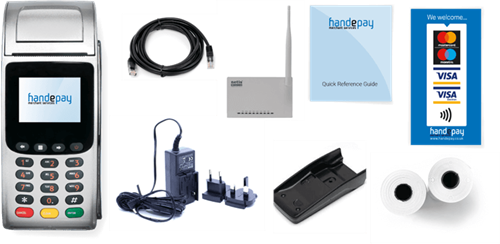
Alongside your portable card machine, you’ll find a charging dock + pin – to charge your terminal when it’s not in use – as well as a power supply for your charging dock. The box will also include a Netis router, for taking payments wirelessly, a window decal to advertise that you can take card payments, two receipt paper rolls and a guide to operating your machine.
Mobile
What’s included in your box?
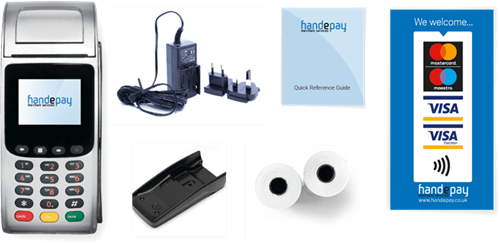
Your box will include a charging dock and power supply for your machine, two paper rolls so you can start taking payments and printing receipts straight away, and a quick reference guide for your device. You’ll also find a window decal to promote that you can take card payments, and your mobile card machine itself, of course.
How to install your card machine

Installing your countertop card machine
Step 1. Terminal connections
- Place the terminal face down on a flat surface, push the two tabs upwards and remove the rear cover
- Remove the cable tidy
- Thread the black power supply cable to the right of the cable tidy recess and insert the plug into the rear of the terminal
- Thread the telephone cable through the cable tidy recess and insert the plug into the socket with the blue LINE label
- Connecting the terminal to an internet connection point? Thread the network cable to the left of the cable tidy recess and insert the plug into the socket labelled LAN instead
- Refit the cable tidy and push the rear cover until you hear a ‘click’
- Finally, connect the telephone cable to the telephone socket, and the network cable (if required) to your internet connection point

Step 2. Paper roll installation
- With the terminal facing up, gently pull upwards on the lever found in the middle of the printer floor
- Remove any packing material from the paper roll
- Slot the paper roll into place in the machine, ensuring the free paper end is at the screen-end of the compartment, facing outwards
- Pull 10cm of the paper until it protrudes from the top of the terminal
- Once the paper roll is installed, close the printer door, pushing until you hear a ‘click’
- Remove the excess paper by pulling down and tearing along the serrated edge
Step 3. Turning on the terminal
- Connect the power supply to a nearby electrical outlet
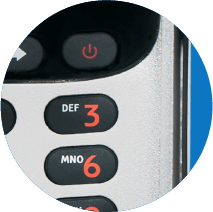
- Hold down the power button (located to the right of the menu buttons) until the display illuminates and the terminal beeps
- Remove any protective film from the display
For step by step advice on transactions and end of the day/shift change procedures, please refer to your quick reference guide.
Installing your portable card machine
Step 1: Terminal battery installation
- Place the terminal face down on a flat surface and remove the battery cover by applying gentle pressure to the tab and pulling upward
- Insert the battery into the terminal
- Replace the cover
Step 2. Paper roll installation
- With the terminal facing up, gently pull upwards on the lever found in the middle of the printer floor
- Remove any packing material from the paper roll
- Slot the paper roll into place in the machine, ensuring the free paper end is at the screen-end of the compartment, facing outwards
- Pull 10cm of paper until it protrudes from the top of the terminal
- Once the paper roll is installed, close the printer door, pressing until you hear a ‘click’
- Remove the excess paper by pulling down and tearing along the serrated edge
Step 3. Charging stand connection
- Don’t turn the power on until instructed
- Plug the power supply into the charging stand (if supplied)
- A red light on the charging stand will show the power is present
Step 4. Wi-Fi access point connection
- Ensure your terminal remains switched off
- Plug the power cable into the back of the access point
- The Wi-Fi network cable must be plugged into the blue LAN socket on the access point
- Plug the other end of the network cable into your internet source
- If there is a successful Ethernet connection, the WAN light on the front of the access point will be solid green and the SYS light will flash on and off (don’t proceed to step 5 until there’s a successful Ethernet connection)
Step 5. Charging the terminal
- Place the terminal on the stand (if supplied) or insert the power supply connector directly into the rear of the terminal
- Plug the power supply into the electrical outlet and switch the power supply on
- Charge the battery for two to four hours, until it’s fully charged
- When not in use, leave the terminal on the stand (if supplied) or connect to the power supply, to maintain charge
Step 6. Turning on the terminal
- Once you’ve completed steps 1–6, hold down the power button (located to the right of the menu buttons) until the display illuminates and the terminal beeps
- Remove any protective film from the display
For step by step advice on transactions and battery information, please refer to your quick reference guide.
Watch our installation video
For more help, check out our easy-to-follow portable card machine installation video:
Installing your mobile card machine
Step 1: Terminal battery installation
- Place the terminal face down on a flat surface and remove the battery cover by applying gentle pressure on the tab and pulling upward
- If a SIM is not pre-fitted, insert the supplied SIM into the socket marked SIM1 (for GPRS or 3G versions only)
- Remove the packing material and insert the battery into the terminal
- Replace the cover
Step 2. Paper roll installation
- Place the terminal face down on a flat surface and remove the battery cover by applying gentle pressure on the tab and pulling upward
- If a SIM is not pre-fitted, insert the supplied SIM into the socket marked SIM1 (for GPRS or 3G versions only)
- Remove the packing material and insert the battery into the terminal
- Replace the cover
Step 3. Charging the terminal
- Take the power supply and plug the small connector into the rear of the terminal
- Only once this is done should you plug the power supply into the electrical outlet
- Charge the battery for two to four hours, until it’s fully charged
- Battery status is indicated in the top right-hand corner of the display when the terminal is switched on
- When not in use, you can leave the terminal connected to the power supply to maintain charge
Step 4. Turning on the terminal
- Hold down the power button (located to the right of the menu buttons) until the display illuminates and the terminal beeps
- Remove any protective film from the display
For step by step advice on transactions and end of the day/shift change procedures, please refer to the quick reference guide that came with your terminal.
Get in touch
For more help and advice on how to install a credit card machine, get in touch with our team.
Would you like
a callback?
FIND OUT MORE
Talk to an advisor today...